Palworld 1.0 Bellanoir Nuke Build for Hard Mode Towers
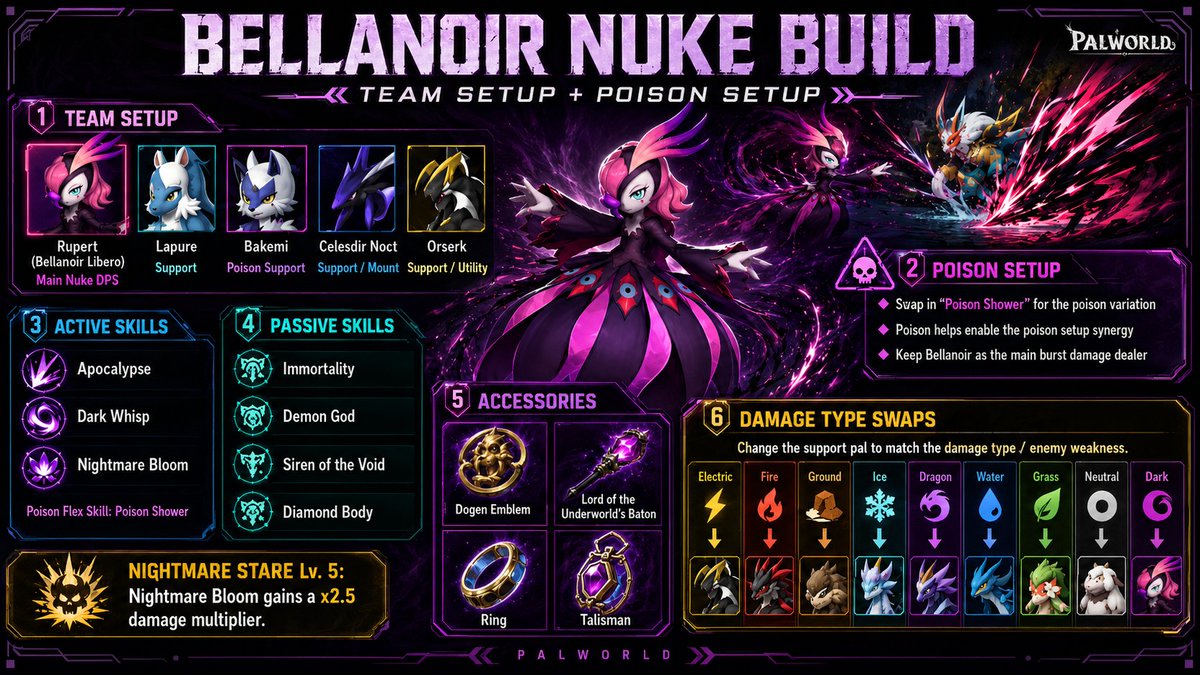
One-shot burst comp using Bellanoir Libero's Nightmare Bloom with support pals for cooldown, poison, and attack stacking. Deletes most Hard Mode tower bosses in a single nuke cycle.
The Core Strategy
Hard Mode Towers in Palworld 1.0 hit hard and punish long fights. Instead of endurance, this build turns each tower boss into a short burst check: summon Bellanoir Libero, stack support buffs, fire Nightmare Bloom for massive Dark damage, then recall before the boss can retaliate. With the right team, most towers fall in one or two nuke cycles.
Bellanoir Libero's Nightmare Bloom (600 power Dark skill) gets a 2.5x multiplier from Nightmare Stare partner skill at Lv.5. Stack support pals for cooldown reduction, attack buffs, and poison to amplify damage further. Recall Bellanoir after each nuke to avoid interrupts and one-shots.
The Nuke Team
Five pals form the core comp. Each has a specific role in amplifying Bellanoir Libero's burst damage or keeping it alive long enough to cast.
Bellanoir Libero is the nuke. Nightmare Bloom at 600 Dark power with the 2.5x Nightmare Stare multiplier is the highest single-hit burst in the game. Max condensation, IVs, trust, and awakening are non-negotiable for the numbers to work.
Lapure cuts partner-skill cooldown by roughly 50%, letting Nightmare Bloom come back up every ~15 seconds instead of 30+. This means you can nuke twice in the time a solo Bellanoir would nuke once.
Bakemi reduces the boss's Attack when the target is poisoned. This helps Bellanoir survive long enough to land the full nuke cast, especially on towers with high burst damage.
Celesdir Noct provides a massive damage boost (community-cited around 80%) at the cost of damage-over-time on your summoned pals. Offset this with Immortality on Bellanoir so the DoT does not kill it before the nuke lands.
Orserk stacks Attack and Defense buffs up to 150% as the player lands weapon hits. Using a Drone Launcher, the drones stack this passively and fast while you focus on positioning and status application.
Put Poison Shower on Bellanoir (or apply poison via crossbow arrows or player tools). This triggers Bakemi's Attack reduction and pairs with other status amplifiers for extra damage. Highly recommended by the community for tougher towers.
Replace one support with a type-boosting Pal matching the boss weakness (Electric, Fire, Ground, Ice, Dragon, Water, Grass, Neutral, or Dark). The core stays the same while adapting to element resistance.
Bellanoir Libero Passives and Skills
For pure tower clears, prioritize summon, nuke, recall. The goal is maximum burst in one cast window.
Partner Skill
- Nightmare Stare Lv.5 - The 2.5x multiplier on Nightmare Bloom is non-negotiable. Without it, the nuke is far weaker.
Active Skills
- Nightmare Bloom - Core nuke (Dark, 600 power). The entire build revolves around this skill.
- Filler skills: Apocalypse, Dark Wisp, or low-cooldown options. Some players run Poison Shower for the variation.
Recommended Passives
For raw Attack, Twin-Bladed Holy Sword or God of Destruction / Demon God are alternatives. Note that God of Destruction trades HP, making it riskier. The pure DPS tower version works because you can unsummon Bellanoir after the nuke, so survivability passives matter less than in raids.
For towers: higher Attack, higher risk (you control summon/recall timing). For raids: Immortality + Diamond Body + lifedrain so the cast is not interrupted. Do not use the glass-cannon raid build on towers without recall timing.
Player Accessories
Equip accessories that boost both player and Pal attack. The player's role is to stack Orserk buffs and apply status while Bellanoir charges.
- Dogen Emblem - Player and Pal Attack boost.
- Lord of the Underworld's Baton - Pal Attack + Dark damage.
- Damage Ring / Damage Talisman - Or Lyleen Noct's Talisman for extra Dark/Defense.
- Flex 4th slot - Personal survivability or mobility (jump boots, resistance ring).
Use a Drone Launcher (or any rapid-fire weapon) so Orserk stacks automatically while you focus on positioning and poison application.
Step-by-Step Execution
-
Enter the Hard Mode Tower
Equip the full team, accessories, and poison application tools (crossbow with poison arrows or Poison Shower on Bellanoir). Confirm Nightmare Stare is at Lv.5 before entering.
-
Summon Bellanoir and Activate Nightmare Stare
Summon Bellanoir Libero and immediately activate the partner skill so the next Nightmare Bloom gets the 2.5x multiplier. Position away from the boss's opening attack range.
-
Apply Poison Immediately
Apply poison right away (crossbow arrows, Poison Shower, or player tools). This enables Bakemi's Attack reduction on the boss and any damage-to-poisoned multipliers. If using burn or other status pals, apply those too.
-
Fire Nightmare Bloom
Let Nightmare Bloom cast. Orserk stacks build from your drones/weapon hits passively. Celesdir Noct and Lapure keep damage and cooldown high. The boss should take massive Dark damage in a single hit.
-
Recall Bellanoir After the Nuke
Recall Bellanoir immediately after the nuke lands, or if it starts taking heavy pressure. Leaving it out causes AI pathing issues on some bosses and risks one-shots or cast interrupts.
Do Not Leave Bellanoir OutThe AI can stall or get interrupted on certain tower bosses. Always recall after each nuke and re-summon for the next cycle.
-
Swap for Elemental Weakness If Needed
If the first nuke does not finish the boss, swap the flex support for the boss's elemental weakness. Stay mobile (grapple, wings) and interrupt boss casts where possible. Re-summon Bellanoir for the next nuke cycle.
-
Repeat Until the Boss Drops
The same core deletes most Hard Mode towers. Only a few (certain Dark or charge-start bosses) need extra caution on the opening. With Lapure's cooldown reduction, your second nuke comes back in ~15 seconds.
Key Decision Points
-
Pure DPS vs Survivability Passives
Towers favor higher Attack passives because you control summon/recall timing. Raids favor Immortality + Diamond Body + lifedrain so the cast is not interrupted. Use the tower version only if you can recall reliably.
-
Poison On or Off
On for tougher fights where survivability matters (Bakemi's Attack reduction helps a lot). Off if you want pure skill slots for more damage options. The poison variation is the community-recommended default.
-
Elemental Swap vs Keep Core
Keep all five listed pals for general use. Swap one support only when the boss resists Dark hard or has a clear type weakness that multiplies further. The core comp handles most towers without swaps.
-
Player Weapon Choice
Drone Launcher for effortless Orserk stacks (drones hit passively). Otherwise any consistent rapid-fire hitter works. The goal is landing hits fast to stack Orserk's 150% buff.
Common Mistakes to Avoid
- Missing Nightmare Stare Lv.5. Without the 2.5x multiplier, the nuke is far weaker and most towers will not die in one cycle.
- Leaving Bellanoir out continuously. The AI can stall or it gets interrupted and one-shot. Always recall after each nuke.
- Skipping poison or Orserk stacking. Big damage left on the table. Poison enables Bakemi's reduction; Orserk stacks 150% Attack/Defense.
- Using glass-cannon passives without Diamond Body or recall timing on tougher towers. The cast gets interrupted and the nuke never lands.
- Not maxing condensation, IVs, trust, and awakening. The community repeatedly says the difference is night and day. Raw level alone is not enough.
- Ignoring the opening charge or clone mechanics on specific bosses. Some Dark towers have fast opening attacks that can interrupt your setup if you are not positioned correctly.
Demonstration Videos
Reference Image